
Creating Airflow Services to run airflow as a daemon using systemd in Ubuntu
A tutorial about how to create Airflow daemon using systemd in Ubuntu 22.04. To know the basics of airflow and how to install it, please go through the blog Getting Started With Airflow.
Airflow is an amazing tool to author, schedule and monitor workflows. It’s one of the most used platforms by Data Engineers. I mostly use it to create and schedule data pipelines. One thing I always wanted to do was to start airflow as soon as my system boots without activating the virtual environment where airflow is installed and type airflow webserver and airflow scheduler manually.
I am not saying you shouldn’t do that. I just feel like you should always try to automate the boring stuff. My first step to do it was creating alias in ~/.bashrc to activate the airlfow environment and run those two commands, but, it turns out linux has a built-in mechanism to create custom services, enabling them to get started at system boot time and start/stop them as a service. I will be sharing a simple way to create a service for your apache-airflow webserver and scheduler, so that you can run it as a service.
Create a Service for Airflow Webserver
Creating Unit File for Service
First, you will have to create a service file name airflow-webserver.service inside /etc/systemd/sytem/ . Use command below to do it:
sudo touch /etc/systemd/system/airflow-webserver.service
Once the file is created you can use vim/nano to write configuration for file.
Writing Service Configuration in the “unit” File
The file we just created should specify the dependencies, environment variables, and other details about the webserver process, such as the user and group it should run as, the command to start the process, and how to handle restarts and failures.
You can use following configuration for getting started:
[Unit]
Description=Airflow webserver daemon
After=network.target mysql.service
Wants=mysql.service
[Service]
Environment="PATH=$PATH:/home/<user_name>/airflow_env/bin:/home/<user_name>/airflow/"
User=<user_name>
Group=<group_name>
Type=simple
ExecStart=/home/<user_name>/airflow_env/bin/airflow webserver
Restart=on-failure
RestartSec=5s
PrivateTmp=true
[Install]
WantedBy=multi-user.target
Here, Environment and ExecStart should hold values depending on the virtual environment in which you have installed airflow.
A short description of above configuration
1. Description: It’s a small description about our service.
2. After: It simply means that your service must be started after the services that are required for your daemon to run, like for apache-airflow we need network, mysql to be ready before it gets started. If your apache-airflow installation requires redis or rabbitmq services than you can specify the dependency here
3. Environment: Tt specifies the file where service will find or create its environment variables
4. User: Your Login username, the specified userid will be used to invoke the service.
5. ExecStart : here you can specify the command to be executed or set the proper path to your script that needs to be excuted. in our case we simple need to run the command airflow webserver
6.Restart: by default, systemd does not restart your service if the program exits for whatever reason. This is usually not what you want for a service that must be always available, so we’re instructing it to always restart on-failure
&. RestartSec: by default, systemd attempts a restart after 100ms. You can specify the number of seconds to wait before attempting a restart, using RestartSec.
Loading, Enabling, and Starting our Service.
First load the service using command:
sudo systemctl daemon-reload
Now, enable the service airflow-webserver.service with:
sudo systemctl enable airflow-webserver.service
Finally, you can start the service by:
sudo systemctl start airflow-webserver.service
After starting the service check the status of the service by using command:
sudo systemctl status airflow-webserver.service
If you have successfully started the service, you will see something like this:
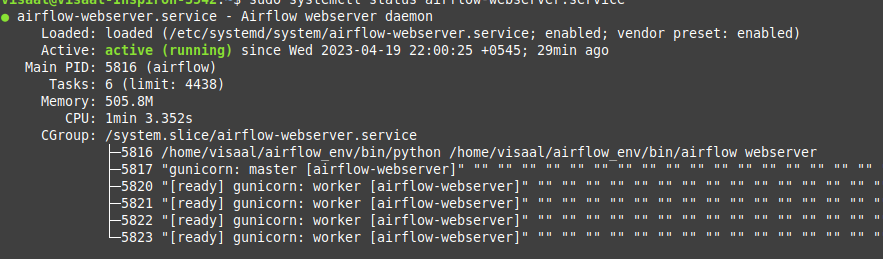
Congratulations, now you have successfully created a service to start with your system boot so that you can directly go to 0.0.0.0:8080 to access the dags instead of activating the environment and then type airflow webserver and airflow scheduler every time you want to run dags.
For creating service for airflow scheduler, follow the same process to create a file airflow-scheduler.service and then replace the ExecStart with /home/
REFERENCES
- https://www.upsolver.com/blog/airflow-as-a-daemon
- Running airflow as a service in centos7
Comments